
#BuiltWithHERE
How LINK Transport Powers Just-In-Time Logistics with HERE WeGo Pro
Mohini Todkari — 11 June 2025
6 min read
13 February 2025
In today's world, mapping solutions have become a core component of many web applications. HERE Technologies offers a comprehensive suite of location-based services, including interactive maps, geocoding, and real-time traffic information. If you are building a web application using OutSystems, you might want to integrate HERE Maps API for JavaScript to provide powerful location features to your users.
This guide walks you through the process of integrating HERE Maps API for JavaScript with OutSystems. We will also highlight a potential common issue that developers may face when integrating the API, specifically related to AMD modules and the "buffer" error, and provide the solution to overcome it.
OutSystems is a leading low-code platform that helps developers quickly build applications with minimal manual coding. It supports the integration of various third-party APIs, including mapping services like HERE Maps. By integrating HERE Maps with OutSystems, you can:
Add powerful geospatial features to your app.
Use interactive maps with features like real-time traffic, geocoding, route planning, and satellite views.
Customize the map to fit your application's needs.
Before you begin the integration, make sure you have:
A valid API key from HERE Technologies (obtainable from HERE Platform Portal).
A basic OutSystems Reactive Web Application to work with.
Basic knowledge of how to create Client Actions and work within OutSystems.
1. Set Up the Environment:
Open OutSystems Service Studio.
Create a Reactive Web App by clicking New Application → Reactive Web App.
Give your app a name (e.g., HEREMapsDemo).
2. Create the Screen:
In the Interface tab, right-click UI Flows → MainFlow → Add Screen.
Select Blank or any predefined layout like LayoutBlank. This screen will be where you integrate the map.
OutSystems provides an intuitive interface for adding JavaScript logic through Client Actions. In this case, we need to dynamically load the HERE Maps API using JavaScript and initialize the map.
1. Navigate to Logic Tab:
Go to the Logic tab in Service Studio.
2. Create a Client Action:
Under Client Actions, right-click and select Add Client Action.
Name it InitializeMap.
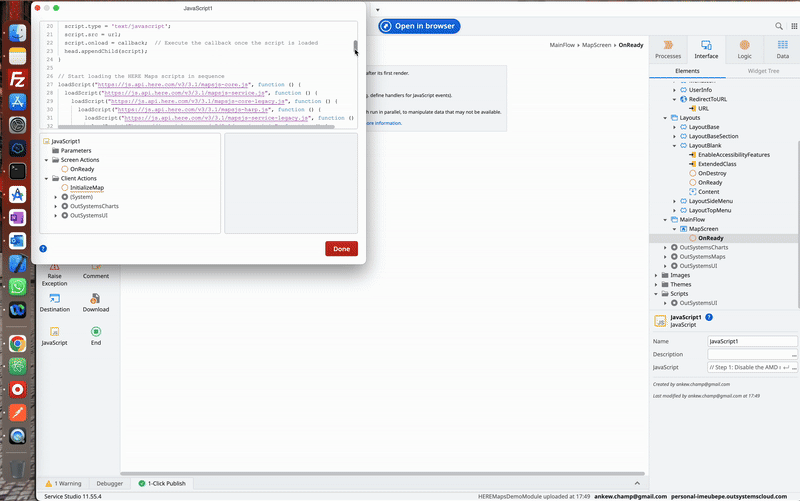
3. Add the "Run JavaScript" Node:
Inside your Client Action, drag and drop the Run JavaScript node from the toolbox.
In the JavaScript property, paste the JavaScript code that loads the HERE Maps API and initializes the map.
4. JavaScript Code:
Paste the following code inside the Run JavaScript node:
// Step 1: Disable the AMD module loader by setting 'define' and 'require' to undefinedvar oldDefine = window.define;var oldRequire = window.require;
window.define = undefined; // Temporarily disable 'define'window.require = undefined; // Temporarily disable 'require'
// Step 2: Dynamically load the HERE Maps scripts and CSSvar head = document.getElementsByTagName('head')[0];
// Load CSS first (mapsjs-ui.css)var linkHere = document.createElement('link');linkHere.rel = 'stylesheet';linkHere.type = 'text/css';linkHere.href = 'https://js.api.here.com/v3/3.1/mapsjs-ui.css';head.appendChild(linkHere);
// Function to load each script sequentiallyfunction loadScript(url, callback) {    var script = document.createElement('script');    script.type = 'text/javascript';    script.src = url;    script.onload = callback; // Execute the callback once the script is loaded    head.appendChild(script);}
// Start loading the HERE Maps scripts in sequenceloadScript("https://js.api.here.com/v3/3.1/mapsjs-core.js", function () {    loadScript("https://js.api.here.com/v3/3.1/mapsjs-service.js", function () {        loadScript("https://js.api.here.com/v3/3.1/mapsjs-harp.js", function () {            loadScript("https://js.api.here.com/v3/3.1/mapsjs-ui.js", function () {                loadScript("https://js.api.here.com/v3/3.1/mapsjs-mapevents.js", function () {                    // Step 3: Restore 'define' and 'require' after scripts are loaded                    window.define = oldDefine;                    window.require = oldRequire;
                    // Step 4: Initialize the map once all scripts are loaded                    initializeMap();                });            });        });    });});
// Step 5: Define the function that initializes the map with HARP enginefunction initializeMap() {    var apiKey = "yourapikey"; // Replace with your real HERE API key
    // Step 1: Platform initialization    var platform = new H.service.Platform({        apikey: apiKey    });
    // Step 2: Set up the layers and map engine type    var engineType = H.Map.EngineType['HARP'];    var defaultLayers = platform.createDefaultLayers({        engineType: engineType,        pois: true    });
    // Step 3: Initialize the map with the HARP engine    var map = new H.Map(        document.getElementById('MapContainer'), // Ensure this matches your container ID        defaultLayers.vector.normal.map,        {            engineType: engineType,            center: { lat: 52.51604, lng: 13.37691 }, // Center over Berlin, change if needed            zoom: 13,            pixelRatio: window.devicePixelRatio || 1        }    );
    // Step 4: Enable interaction and UI controls    var behavior = new H.mapevents.Behavior(new H.mapevents.MapEvents(map));    var ui = H.ui.UI.createDefault(map, defaultLayers);
    // Step 5: Remove the default map settings control    ui.removeControl("mapsettings");
    // Step 6: Create custom map settings control    var ms = new H.ui.MapSettingsControl({        baseLayers: [            {                label: "normal",                layer: defaultLayers.vector.normal.map            },            {                label: "satellite",                layer: defaultLayers.raster.satellite.map            }        ],        layers: [            {                label: "layer.traffic",                layer: defaultLayers.vector.traffic.map            }        ]    });
    // Step 7: Add the custom map settings control    ui.addControl("customized", ms);
    // Step 8: Make the map responsive    window.addEventListener('resize', () => map.getViewPort().resize());
// Step 9: Log success (optional) console.log("HERE Map has been successfully initialized with HARP engine!");}Ensure you have a Container on the screen where the map will be displayed.
Set the ID of the container to MapContainer. This is where the map will be initialized.
Once you've added the Client Action and JavaScript code:
Publish the application.
Test it in your browser. The map should initialize correctly in the designated container.
The Problem:
While integrating the HERE Maps API with OutSystems, you might encounter the error:
Module name "buffer" has not been loaded yet for context: _. Use require([])This happens because the HERE Maps API internally uses AMD (Asynchronous Module Definition) to manage dependencies. OutSystems uses RequireJS, which detects these AMD modules and tries to resolve dependencies. Unfortunately, RequireJS tries to load the buffer module, which is not available in the browser environment, leading to this error.
The Solution: Disable AMD at Runtime
To avoid this issue, you can disable RequireJS temporarily when loading the HERE Maps API scripts, and then restore it after the scripts have finished loading.
Here’s how to fix it:
Disable define and require to prevent AMD module loading.
Load the HERE Maps scripts one by one, ensuring the map initializes only after all scripts are loaded.
Restore define and require after the scripts are loaded.
Integrating HERE Maps API for JavaScript with OutSystems is straightforward, but developers may encounter issues related to AMD module loading due to RequireJS conflicts. The "buffer not loaded" error happens because HERE Maps tries to load buffer, a Node.js module, in the browser environment.
By disabling AMD temporarily during the script load, you can bypass these conflicts and ensure that the HERE Maps API works smoothly within your OutSystems app. With this solution, you can leverage HERE’s powerful location services while avoiding module loading issues.
Ensure correct script loading by disabling AMD and RequireJS temporarily during the load of HERE Maps scripts.
Sequential loading of scripts guarantees all libraries are loaded in the right order before initializing the map.
This solution helps developers overcome the "buffer" not loaded error, ensuring smooth integration.
By following this guide, you can integrate HERE Maps API with OutSystems and enjoy its full suite of mapping features without the hassle of module loading issues.

Sachin Jonda
Principal Support Engineer
Share article
Why sign up:
Latest offers and discounts
Tailored content delivered weekly
Exclusive events
One click to unsubscribe

