How to Create an Image Overlay on a Map

Today’s blog post is a quick tutorial on how to add an image overlay to a map with the HERE Maps API for JavaScript. This is a quick three step process, so let’s get started!
Step 0: Spoiler Alert
If you just like to see some code, you can check out the complete code for this post on GitHub. If you want to see what the end result looks like before you get started, you can see the code running here.
Step 1: Create a basic map
In order to add an overlay to a map, you first need a map. There’s a variety of ways you can set one up. For example, you can use another one of my blog posts called “How to Create a Web Map Application in Under Six Minutes”. You can also follow our getting started guide, open an example in JSFiddle or simply fork our JavaScript examples.
Personally, I have created my own clean full-screen map project in GitHub, which I use as a basis for projects like this. Forking that is probably the easiest way to get going. Remember that you will need an API Key for this, so sign up for your Freemium account to grab one. Once you’ve set up your map, we’re ready for Step 2.
Step 2: Get an overlay image
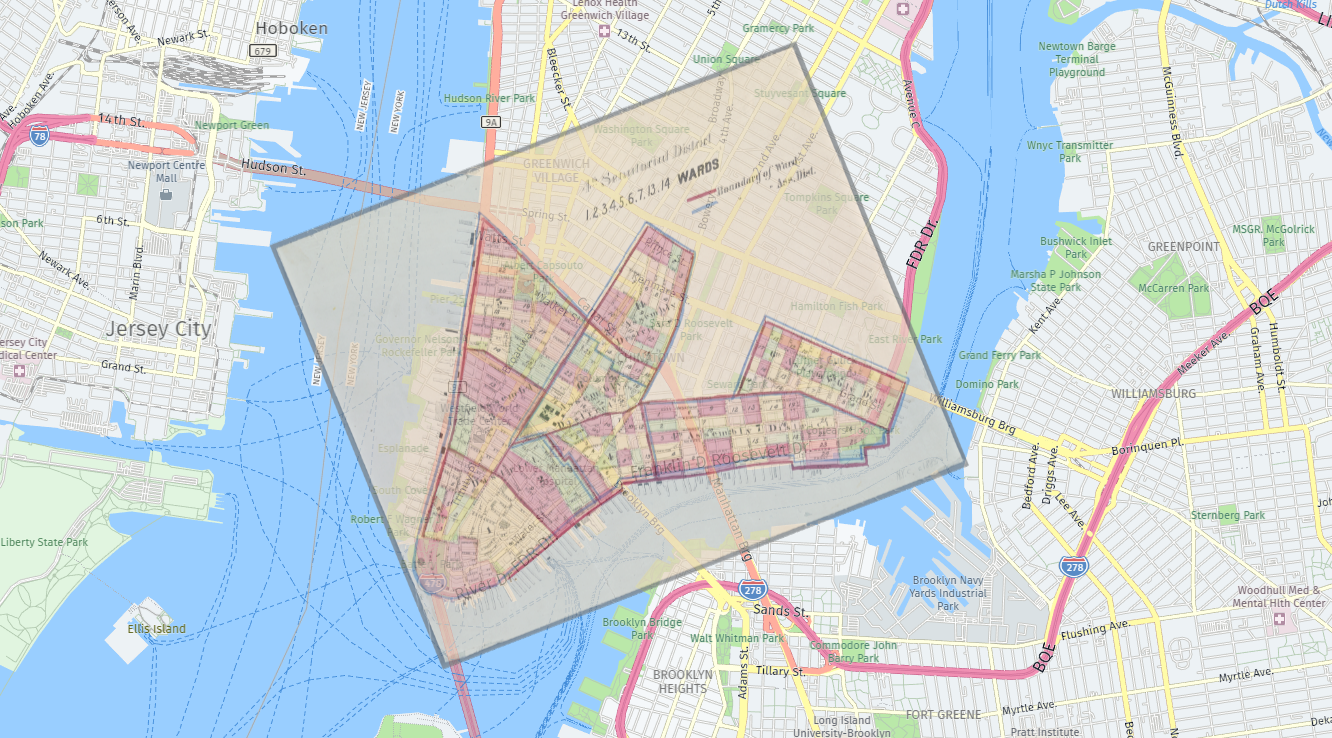
In order to add an overlay to a map, you also need an image to overlay. I’ve found the following 1885 map of the southern tip of Manhattan in the digital collection of the New York Public Library. I’m not 100% sure what it actually depicts (maybe electoral districts for state senators?), but it looks neat and it’s in the public domain, so it suits us just fine. The idea here is to overlay this image on the modern-day map of New York with a dash of opacity.

To use this image in our overlay, we need to create a JavaScript Image object as follows.
  // Step 2: get an overlay image
  let overlayImage = new Image();
  overlayImage.src = '/overlay.png';
Step 3: Create an overlay object
Now that we have a map and an image, we need to create an Overlay object. To do so, we need three things.
- A location for the overlay, expressed as an H.geo.Rect using latitude and longitude
- The image (see Step 2)
- Options for the overlay, for example the level of opacity we want (optional)
  // Step 3: create an overlay object and add it to the map
  let overlay = new H.map.Overlay(
    new H.geo.Rect(
      40.73822, -74.03192,
      40.69484, -73.96696
    ),
    overlayImage,
    {
      volatility: true,
      opacity: 0.7
    }
  );
Most of these should be self-explanatory, but the volatility flag probably needs some explanation. Whenever we set a map object such as a marker (or in this case an overlay) to be volatile, we are letting the system know that the position and/or style of this object is expected to change frequently. This results in smoother updates for these changes because the rendering engine will treat these objects differently.
That’s pretty much it! Don’t forget to add the overlay to the map, so it becomes visible. The end result should look something like the image below. (A quick note: the top of the 1885 map wasn’t quite pointing north, so I rotated it in an image editor beforehand.)

You can see the finished code running here. Be sure to zoom and rotate the map (hold down the ALT key), to see how the overlay scales and rotates with the map.
I’ll leave you with a quick tip. If you have larger overlays, you can also split these into tiles and create a custom tile overlay. Check out the Custom Tile Overlay example for more details!
Also, don’t forget to have a look at the complete code in GitHub.
Have your say
Sign up for our newsletter
Why sign up:
- Latest offers and discounts
- Tailored content delivered weekly
- Exclusive events
- One click to unsubscribe